Project structure & Compilation
Project structure overview
The SCADE project structure is based on the SWIFT SPM structure

Directory | Purpose | Comment |
|---|---|---|
.build | The build folder. The compiler stores compiled artifacts in this folder. (APK/IPA files are not stored here.) | Developers may ignore this folder most of the time, and they can also right-click to delete it when necessary. |
Assets | Application assets such as images and media files are stored in this folder. | This folder is equivalent to the iOS Assets Folder. Feel free to create subdirectories, such as images, into it. |
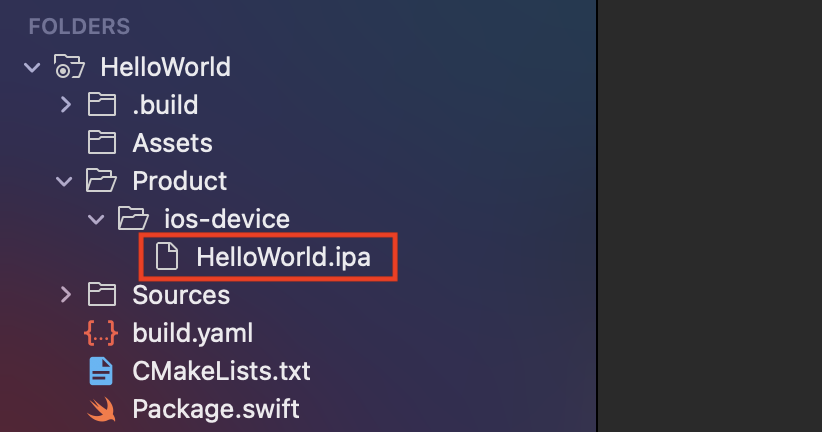
Products | The compiler stores the created IPA and APK files in here | Use this directory to access the target binaries |
Sources | The Sources folder can also be called the root folder. All the important source files and folders of an app are stored in this folder. | |
build.yaml | Settings file for Android and iOS specific settings. | Developers define in this file the required resources, permissions, and other related iOS and Android settings for their app development. (Dependencies are not stored here anymore) |
Package.swift | The Package.swift file, also known as the manifest file, defines the name of an app project, its number of targets, the products it distributes, the dependencies it depends on, and so on. | Developers can store their app project dependencies here. |
Sources/Extensions/Pages | SCADE is using this subfolder to store code that is generated by the IDE. Changes made in the page builder will result in changes to the code of this directory. | These files are all read-only and not modifiable. Developers should not try to modify them. |
SPM Package managerSCADE is using SPM heavily and uses the latest SPM features of Swift 5.3. We believe SPM is the future of iOS / Swift development and SPM is therefore our our strategic package manager in SCADE for the current future
SPM IntroIf you want to brush up on SPM, find articles on SPM here
Project folders
Home Directory and Reference point
If you reference the file directory structure in code, always assume HelloWorld as your home. That means to access an image dog.jpg in the asset folder, you would use Assets/dog.jpg as the path
Sources Directory
The start.swift file
The start.swift file contains the swift code that is executed when the application is started.
The build file
The build file contains important information that is used during the build process:
- the private keys to sign the application when building for iOS
- the location of the icons to be used when building an application
See details here The Build File
Building an app for iOS
The binaries for your iOS app can be exported with two different methods
- ad-hoc method is used for using app on local device
- app-store method is used to upload app in Apple App store
Different export methods require different certificates and provision profiles -
- app-store method needs certificate and provision profile generated for app store
- for testing on local device, ad-hoc certificate and provision profile is needed
Don't forget to install certificate and provision profile to keychain on your computer.
To build for iOS, the most important prerequisite is that you provided the necessary keys for iOS code signing:
Specify Provision profile and Certificate
For reference, you find the build file description here Build File
- Check that the provision-profile attribute has been set
- Check that the certificate attribute has been set
Your build file should look something like this

iOS Code Signing - Provision Profile and certificateAt this point, we assume that you are familiar with code signing on iOS and you have developed your first iOS app before.
In case this is not true, and you are not familiar with this process, we would recommend to educate yourself by reading some article on this topic. Explaining how iOS code signing works is out of scope of this tutorial, here a list of recommended articles
Specify App Icons
In order to specify the app's icon, you need to specify different png files in different resolutions. Here our example from the HelloWorld app

Select "Create IPA" target
To compile to IPA binary, please select Create IPA in the drop down target selector.

You now can use Command + B or the play button to start the compilation and IPA creation process.
The entire .ipa file is built and during compilation, you see the output in the console. You should finally see:

The iOS app has been created and is available for upload in the products directory.
Building an app for Android
To build an Android app, make sure SDK and NDK are configured as described here
- Choose the target you want to build. Your options are
- ARM 32bit
- ARM 64bit
- x86 32bit
- x86 64bit
- Press the run button to start the compile process

- It will take a few seconds before the console output starts. The initial compilation takes about ~ 30 seconds depending on project size, later runs are faster. The entire .apk file is built and during compilation, you see the output in the console. You should finally see:

- The Android app has been created and is available for upload in the products directory.

Compiling Android in Release and Debug mode
The binaries in Android can be released in Debug or Release mode. To upload in Google App store, please use Release mode. To include debugging information, please use Debug mode. The binary compiled in Debug mode will be a couple of MB larger.
The steps to set the release mode are simple
- Specify the build-type in SCADE project build file
- Create a keystore file that contains the key
- Create a keystore properties file that contains the location of the keystore file
- Specify the location of the keystore properties file in the SCADE project build file
Specify the buildType
To set the mode, open the build file and change the build-Type setting to either Debug or Release.

Create keystore file
Next, create the keystore file. The keystore file contains the keys. Use the keytool tools to create the file and make sure its location is set correctly in the keystore.properties file.
keytool -genkey -v -keystore <name of keystore file> -alias <keyname> -keyalg RSA -keysize 2048 -validity 10000Here an example

Create keystore properties file
Create a text file and call it keystore.properties. Add the following content. Make sure the storeFile entry points to the keystore file you created.
storePassword=MyPassword
keyPassword=MyPassword
keyAlias=MyPassword
storeFile=/<locationToFile>/<keystore_file_name>
Set location of keystore properties file
Set the location of the keystore.properties file in the keyStoreProperties field in the build file. Use Command + F to search for keyStoreProperties and set the path to reflect the location of the keystore.properties file you just created:

Set Android APK version
There are 2 ways to set Android APK version:
- Set the version of APK in the versionName and versionCode fields in the build file
- Create Android Manifest with correct APK version and set the path to the manifest in the build file
Look at an example of Android Manifest along this path:\ <project>/.build/android-x86(armeabi-v7a)/<project>-android/AndroidManifest.xml
Or create a text file and call it AndroidManifest.xml. Add the following content. Change @ANDROID_VERSION_CODE@ on version code, @ANDROID_VERSION_NAME@ on version name.
<?xml version="1.0" encoding="utf-8"?>
<manifest xmlns:android="http://schemas.android.com/apk/res/android"
    package="@ANDROID_PACKAGE_NAME@"
    android:versionCode="@ANDROID_VERSION_CODE@"
    android:versionName="@ANDROID_VERSION_NAME@" >
    <uses-sdk
        android:minSdkVersion="14"
        android:targetSdkVersion="21" />
    <uses-permission android:name="android.permission.INTERNET" />
@PERMISSIONS_XML@
    <uses-feature android:glEsVersion="0x00020000"/>
    <application
        android:name="@ANDROID_APP_CLASS_NAME@"
        android:allowBackup="false"
        android:icon="@drawable/ic_launcher"
        android:label="@ANDROID_APP_NAME@"
        android:theme="@android:style/Theme.Black.NoTitleBar">
        <activity
            android:name="@ANDROID_ACTIVITY_CLASS_NAME@"
            android:label="@ANDROID_APP_NAME@"
            android:windowSoftInputMode="adjustResize|stateHidden">
            <intent-filter>
                <action android:name="android.intent.action.MAIN" />
                <category android:name="android.intent.category.LAUNCHER" />
            </intent-filter>
        </activity>
        <meta-data
            android:name="com.google.android.geo.API_KEY"
            android:value="@ANDROID_API_KEY@"/>
    </application>
</manifest>
Upload apk file to Android
Hi, we will add this to the IDE shortly, but to upload the apk to your Android, the easiest way currently is to use the adb tool
- Make sure your Android device is connected via USB cable
- Make sure developer mode is enabled
- Execute the following command adb install <filename for apk file>
- To get the file name and path, click on the apk file and use right click, and Properties

- Copy the file and path name and paste it into a console window

- The app is now successfully uploaded to Android !!!
Updated 3 months ago