eReader App
Version 1.0 - November 2016
Introduction
The New York Public Library App SimplyE is a great eReader app for browsing, renting and viewing any kind of book in the NYPL system.

We implemented part of the app for demonstration purposes. The areas we covered are
- the Login page, displaying the NYPL logo and loading data in the background
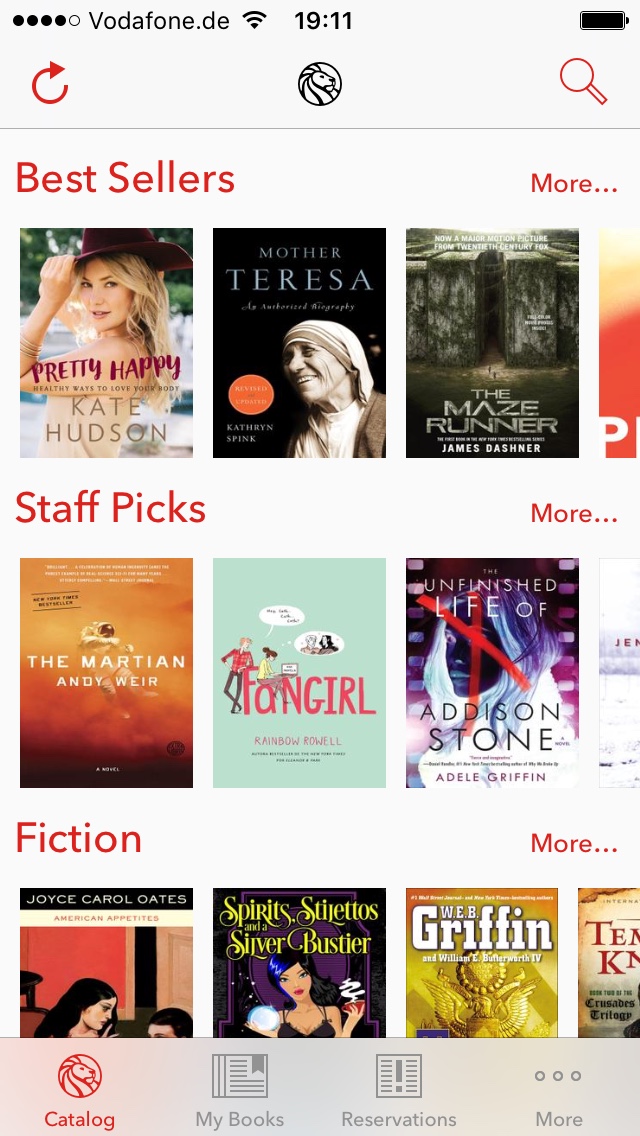
- the Catalog page, displaying all books by category
- the Detail view, displaying details of a specific book
- the Settings page, to demonstrate how to implement a decent settings page
Other features of the app are out of scope and may be covered at a later time.
Create the start page
The start page displays the NYPL lion's white head while loading all the data in the background. It's relatively simple to create:

- Create the NYPL project
- Create a new project called SimplyE (! is not a valid character, compiler complains)
- Add a Login page
- Just make the background red
- Add the lion's head from the res folder
- All res resources are available here XXX
- Center the lions's head
- Center the head
- Add code that you want to execute during startup, for instance preloading data
import ScadeKit

class LoginPageAdapter: SCDLatticePageAdapter {

	// page adapter initialization
	override func load(_ path: String) {
		super.load(path)
	}

	override func activate(_ view : SCDLatticeView) {

		// call parent to finish display activities
		super.activate(view)

		// add code here that is executed after the display of the page
		self.postDisplayActions()
	}

	func postDisplayActions() {
		// put actions that shall happen after the display of the page here
	}
}Create the catalog browsing page
In this step, we create the overall catalog page and structure:
Add a grid structure containing toolbar, navigation bar and book browse area
- For the navigation bar, add a horizontal grid (Linear Layout - Horizontal)
- For the browse area, add a Grid Layout and give it another color (for demo purposes)
- For the toolbar, add a toolbar
- The toolbar by default fills and takes up half of the screen, so that the grid layout covers only the other half. Set Fill Space Vertically to false in order for the browse area to expand south

-
Set the three bitmaps from the res folder. The image names are refresh.svg, NPLIcon.png and magnifying-glass.red.png
-
Align the Bitmaps left, right and center. I used width and height of (24,24) and (32,32) and (32,32)
-
Set Fill Space Horizontally = true
-
To change the background color of the toolbar
a. select toolbar in Outline (toolbar1)
b. Switch to SVG tag
c. Select rectangle
d. Change color to White
Create data classes and sample data
Lets create a data structure Book that holds the necessary information. We create a new Swift class Book.swift.
- Make sure Book derives from EObject so that we can use the data mapping capabilities of the SDK
import ScadeKit

class Book : EObject {
	let id : String
	let title : String
	let author : String
	var bookCoverUrl : String = ""
  	var bookCoverImg : String = ""

	init(id:String, title : String, author : String) {
		self.id = id
		self.title = title
		self.author = author
	}

	init(id:String, title : String, author : String, bookCoverUrl: String) {
		self.id = id
		self.title = title
		self.author = author
		self.bookCoverUrl = bookCoverUrl
	}
}
Furthermore, we need a BookCategory that contains the book per category
import ScadeKit

class Category : EObject {
		let id : String
		let label : String
		let books : [Book]

		init(id:String, label:String) {
			self.id = id
			self.label = label
			self.books = BookManager.sharedInstance.getBooks()
		}
}
We then add a variable of type Category to the main.page.swift
class MainPageAdapter: SCDLatticePageAdapter {

	dynamic var categories : [Category] = ...

}
Finally, we create some code to provide sample values for testing
class CatalogServiceManager {

	static func getCategories() -> [Category] {

		let values = [  ("bestsellers","Best Sellers"),
	         			("staffpicks","Staff Picks"),
	  	     		    ("adventure","Adventure"),
	 		            ("classics","Classics"),
	 		            ("comicsandnovels","Comics and Grafic Novels")]

		return values.map{Category(id:$0,label:$1)}
	}
}
The BookManager provides a list of Books together with a Book title and a JPEG image representing a book covers. The images are sourced locally for the moment being:
class BookManager {

	static let sharedInstance : BookManager = BookManager()
	let classicBooks : [Book]

	private init() {

		let prefix = "res/bookCovers/"

		let classicBookData = [
		       	("1984","1984.jpeg"),
		       	("Alice in Wonderland","aliceInWonderland.jpeg"),
		       	("The Great Gatsby","greatGatsby.jpeg"),
		       	("The Journey to the Center of the Earth","journeyToCenterOfEarth.jpeg"),
		       	("Pride and Prejudice","PrideAnPrejedice.jpeg"),
		       	("The Hobbit","theHobbit.jpeg"),
		       	("Treasure Island","treasureIsland.jpeg"),
		       	("War of Worlds","warOfWorlds.jpeg")
		      ]

		 self.classicBooks =
		 	classicBookData.enumerate().map{Book(id:String($0),title:$1.0,author:"Frank",bookCoverUrl:"\(prefix)\($1.1)")}
	}

	func getBooks() -> [Book] {
		return self.classicBooks

	}
}
Add category browsing control
We now are going to use the list control to display both the category label and a list of thumb images that represent the books that belong to the category.
The list control contains
- a label control and
- a horizontal grid that contains the book images

Follow the following steps to create the browsing control
- Add list control (Containers - list view) and call it ctrlListBookCatalog
- Add linear layout horizontal to contain the category name and call it viewCategory
- Add label inside viewCategory
- Add linear layout horizontal to contain the thumb images and call it rowviewbooks
- For each book, add a linear horizontal layout and insert a bitmap. We use the linear horizontal layout to add a margin around the bitmap. Call the bitmap bmpbook1 (increase number for each bitmap). I added 10 linear horizontal layouts and bitmaps for this example
- Adjust margins of the list control
Create binding between model and controls
Create a link between the page's class instance variables and the UI controls by using the binding editor as displayed below

Wire sample data to control
- load the categories using the CatalogServiceManager
- for each book in each category, set the book URL so that the correct thumbnail is displayed
import ScadeKit

class MainPageAdapter: SCDLatticePageAdapter {

	dynamic var categories : [Category] = []

	// page adapter initialization
	override func load(_ path: String) {
		super.load(path)
		self.categories = CatalogServiceManager.getCategories()
	}

	override func show(_ view: SCDLatticeView!) {
		super.show(view)
		populateBitmaps()
	}

	func populateBitmaps() {

		// get a reference to the name of the list control
		let ctrlLst = self.page!.getWidgetByName("ctrlListBookCatalog") as! SCDWidgetsList

		// Iterate across the elements in the list (the categories)
for (num,e) in ctrlLst.elements.enumerated() {

			let category = self.categories[num]

			// get bitmaps based on categories
			let booksPerCategory = category.books

			// get the horizontal grid layout control that contains the bitmaps
			let row = e.getWidgetByName("rowviewbooks") as! SCDWidgetsRowView

			// iterate through list of books and set the respective URLS
			// if the list of books is greater than the number of bitmaps,
			// the respective books will be ignored
			for (index,book) in booksPerCategory.enumerated() {
				//
				let bitmapname = "bmpbook\(index+1)"
				print("bitmapname \(bitmapname)")
				if let bitmap = row.getWidgetByName(bitmapname) as? SCDWidgetsBitmap {
					print("hello bitmap \(bitmap)")
					print("book : \(book.bookCoverUrl)")
					bitmap.url = book.bookCoverUrl
					bitmap.isContentPriority = false
				}
			}
		}
	}
}
Which results in a first iteration of our book browsing capability

Add scrollable capability
Each grid (grid view, linear horizontal or vertical grid) can be assigned the ability to support scrolling. The scrolling is using the native scrolling functionality of the native OS, and provides the same effect.
To make a content container scrollable, enclose the elements that you want to be scrollable in a scrollable box. In our example we enclosed everything in a scrollbox, beginninig with rowviewbooks and its dependent elements
<g scrollableBox="320 98" scrollable="horizontal" transform="matrix(1 0 0 1 0 0)" scade:scrollableBox="size.w size.h">

    // put everything here that supposed to be scrollable

 </g>
Lets demonstrate it here
Add book clicked event
Let's add an event handler to each bitmap. The event handler fires whenever a specific book is clicked and passes on the book's id (ISBN number)
if let bitmap = row.getWidgetByName(bitmapname) as? SCDWidgetsBitmap {
	  print("hello bitmap \(bitmap)")
	  print("book : \(book.bookCoverUrl)")
	  bitmap.url = book.bookCoverUrl
	  bitmap.isContentPriority = false

	  // add onClickEvent
	  bitmap.onClick.append(SCDWidgetsEventHandler{
        (ev:SCDWidgetsEvent?) in self.displayBookDetails(bookId:book.id)})

   ...
   }

	 func displayBookDetails(bookId:String) {
    	print("BookId : \(bookId)")
   }
Catalog data REST endpoint
We are using two REST endpoints to source the data. Our first endpoint returns a list of ISBN numbers (Unique Book IDs) and URLs for each category.
https://s3.amazonaws.com/scade.io/demo/eReader/overview
{
  "data": [
    {
      "isbns": [
        "0345531108",
        "0316407011",
        "0544272889",
        "184655859X"
      ],
      "urls": [
        "https://images.gr-assets.com/books/1449683242m/27272224.jpg",
        "https://images.gr-assets.com/books/1439497650m/23341628.jpg",
        "https://images.gr-assets.com/books/1445050195m/25897805.jpg",
        "https://images.gr-assets.com/books/1440454476m/24909785.jpg"
      ],
      "category": "Best Sellers"
    },
    {
      "isbns": [
        "0812983432",
        "0385736835",
        "0812994868",
        "0812979524"
      ],
      "urls": [
        "https://images.gr-assets.com/books/1418767826m/23278597.jpg",
        "https://images.gr-assets.com/books/1419181230m/23582285.jpg",
        "https://images.gr-assets.com/books/1384018847m/16113737.jpg",
        "https://images.gr-assets.com/books/1474497772m/30268564.jpg"
      ],
      "category": "Staff Pickks"
    },
    {
      "isbns": [
        "0595002021",
        "0062264990",
        "1943772320",
        "0062003070",
        "1402286619"
      ],
      "urls": [
        "https://s.gr-assets.com/assets/nophoto/book/111x148-bcc042a9c91a29c1d680899eff700a03.png",
        "https://images.gr-assets.com/books/1348526911m/16045320.jpg",
        "https://images.gr-assets.com/books/1428084310m/19504964.jpg",
        "https://images.gr-assets.com/books/1335990320m/13005984.jpg",
        "https://images.gr-assets.com/books/1402544727m/18509608.jpg"
      ],
      "category": "Fiction"
    },
    {
      "isbns": [
        "1416597999",
        "0312198213",
        "030788497X",
        "1455509647"
      ],
      "urls": [
        "https://images.gr-assets.com/books/1400892526m/6582908.jpg",
        "https://images.gr-assets.com/books/1311986684m/1746602.jpg",
        "https://images.gr-assets.com/books/1394857918m/17288598.jpg",
        "https://images.gr-assets.com/books/1366559024m/15791128.jpg"
      ],
      "category": "Nonfiction"
    }
  ]
}
Consume the catalog REST service
For a detailed discussion of consuming a REST endpoint, please see Data services.
-
Consume the data service. Make sure to call the service EreaderService and rename the data structure to BookCategory
-
Create a factory to instantiate the client.
import ScadeKit

class EreaderServiceManager {

	private static var ereader:EreaderService?

	static func getInstance() -> EreaderService {
		if ereader != nil {
			return ereader!
		}
		else {
			print("load model")
			let serviceModel = SCDRuntime.loadMetaModel("EreaderService.service")
        	let ereaderClass = serviceModel!.getEClassifier("EreaderService") as! EClass
        	print("before cast")
			ereader = serviceModel!.eFactoryInstance.create(eClass: ereaderClass) as! EreaderService
			print("after cast")

		}
		return ereader!
	}
}- Create mapping logic to map from the server's BookCategory structure to the client Category data structure
I would be faster to use the server structure directly, but using a client structure is a best practice, as it abstract the app from the server data source. The mapping logic to map from BookCategory to Book is added to the CatalogServiceManager class.
class CatalogServiceManager {

  ....

  static func fromBookCategory(bc:BookCategory) -> Category  {
		// mapping function to transform from BookCategory (server) --> Book (client)
		let books : [Book] = bc.isbns.enumerated().map{let url = bc.urls[$0]; return Book(id:"\($1)",url:"\(url)")}
		return Category(id:bc.category,label:bc.category,books:books)
	}
}- Load the data
Finally, execute the REST service call and the mapping function to retrieve your category data from a live source:
class MainPageAdapter: SCDLatticePageAdapter {

	dynamic var categories : [Category] = []

	// page adapter initialization
	override func load(_ path: String) {
		super.load(path)

		// Get data from REST endpoint instead of local dummy data
		let rsp =  EreaderServiceManager.getInstance().getOverview() as OverviewResponse
		self.categories = rsp.data.map{CatalogServiceManager.fromBookCategory(bc:$0)}
    ....
The video shows the details. After successful consumption, we retrieve the catalog data
Create the book detail page
Create a new page bookdetails.page that shows the book details. The following outline illustrates the structure of the page

The video gives a good example of how to use containers (horizontal linear layout containers mostly) to structure the page. Most notable settings
- the description1 and description2 label are using the multiline capability
- we wrap the bitmap in a layout container for better alignment
- the main display area has one parent container viewBookDetails, so that we can easily apply scrolling
Enhance Book class
We now add additional properties to the Book class and add logic to download the image from the internet based on the URL
import ScadeKit

class Book : EObject {

	let id : String
	let title : String
	let author : String
	var bookCoverUrl : String = ""

	var published : String = ""
	var publisher : String = ""
	var category : String = ""
	var description1 : String = ""
	var description2 : String = ""

	var bookImageInternal : String?
	var bookImage : String {
		get { return bookImageInternal ?? loadBookImage() }
	}

	init(id : String, url : String ) {
		self.id = id
		self.bookCoverUrl = url
		self.title = "unknown"
		self.author = "unknown"
	}

	init(id:String, title : String, author : String) {
		self.id = id
		self.title = title
		self.author = author
	}

	init(id:String, title : String, author : String, bookCoverUrl: String) {
		self.id = id
		self.title = title
		self.author = author
		self.bookCoverUrl = bookCoverUrl
	}

	func loadBookImage() -> String {
	self.bookImageInternal =  NetworkUtils.download(url:self.bookCoverUrl)
		return self.bookImageInternal!
	}
}
The NetworkUtils class is using the SCADE SDK and making a HTTPS request using the HTTP Client.
import ScadeKit

class NetworkUtils {
 static func download(url:String) -> String {
 		let request = SCDNetworkRequest()
 		request.url = url
    let response = request.call()
    print("called out to the internet to get image. Statuscode \(url) \(response!.statusCode)")
    return response!.body
	}
}
Bind to BookDetails page
We add a property of type BookDetails and then link it using the binding panel
- Make sure to set contentPriority to true, causing the bitmap to source its data from the content property
class BookdetailsPageAdapter: SCDLatticePageAdapter {

	dynamic var book : Book?
dynamic var trueAttribute : Bool = true 
Consume endpoint for book details
The REST endpoint to retrieve book details is
https://s3.amazonaws.com/scade.io/demo/eReader/<bookId>
For instance
https://s3.amazonaws.com/scade.io/demo/eReader/0062003070
yields
{
  "isbn": "0062003070",
  "title": "Keepsake",
  "imageurl": "https://images.gr-assets.com/books/1335990320m/13005984.jpg",
  "description": "\"This story of two sisters, each broken in her own way, is as unflinching as it is compassionate. I was pulled in from the first page.\"",
  "description2": "--Marisa de los Santos, <i>New York Times</i> bestselling author of <i>Falling Together</i>",
  "author": "Kristina Riggle",
  "publisher": "William Morrow Paperbacks",
  "published": "26 June 2012"
}- We add the REST endpoint to the existing EreaderService:
a. Press Add
b. Call the method getBookByIsbn
c. Set template to https://s3.amazonaws.com/scade.io/demo/eReader/<isbn>
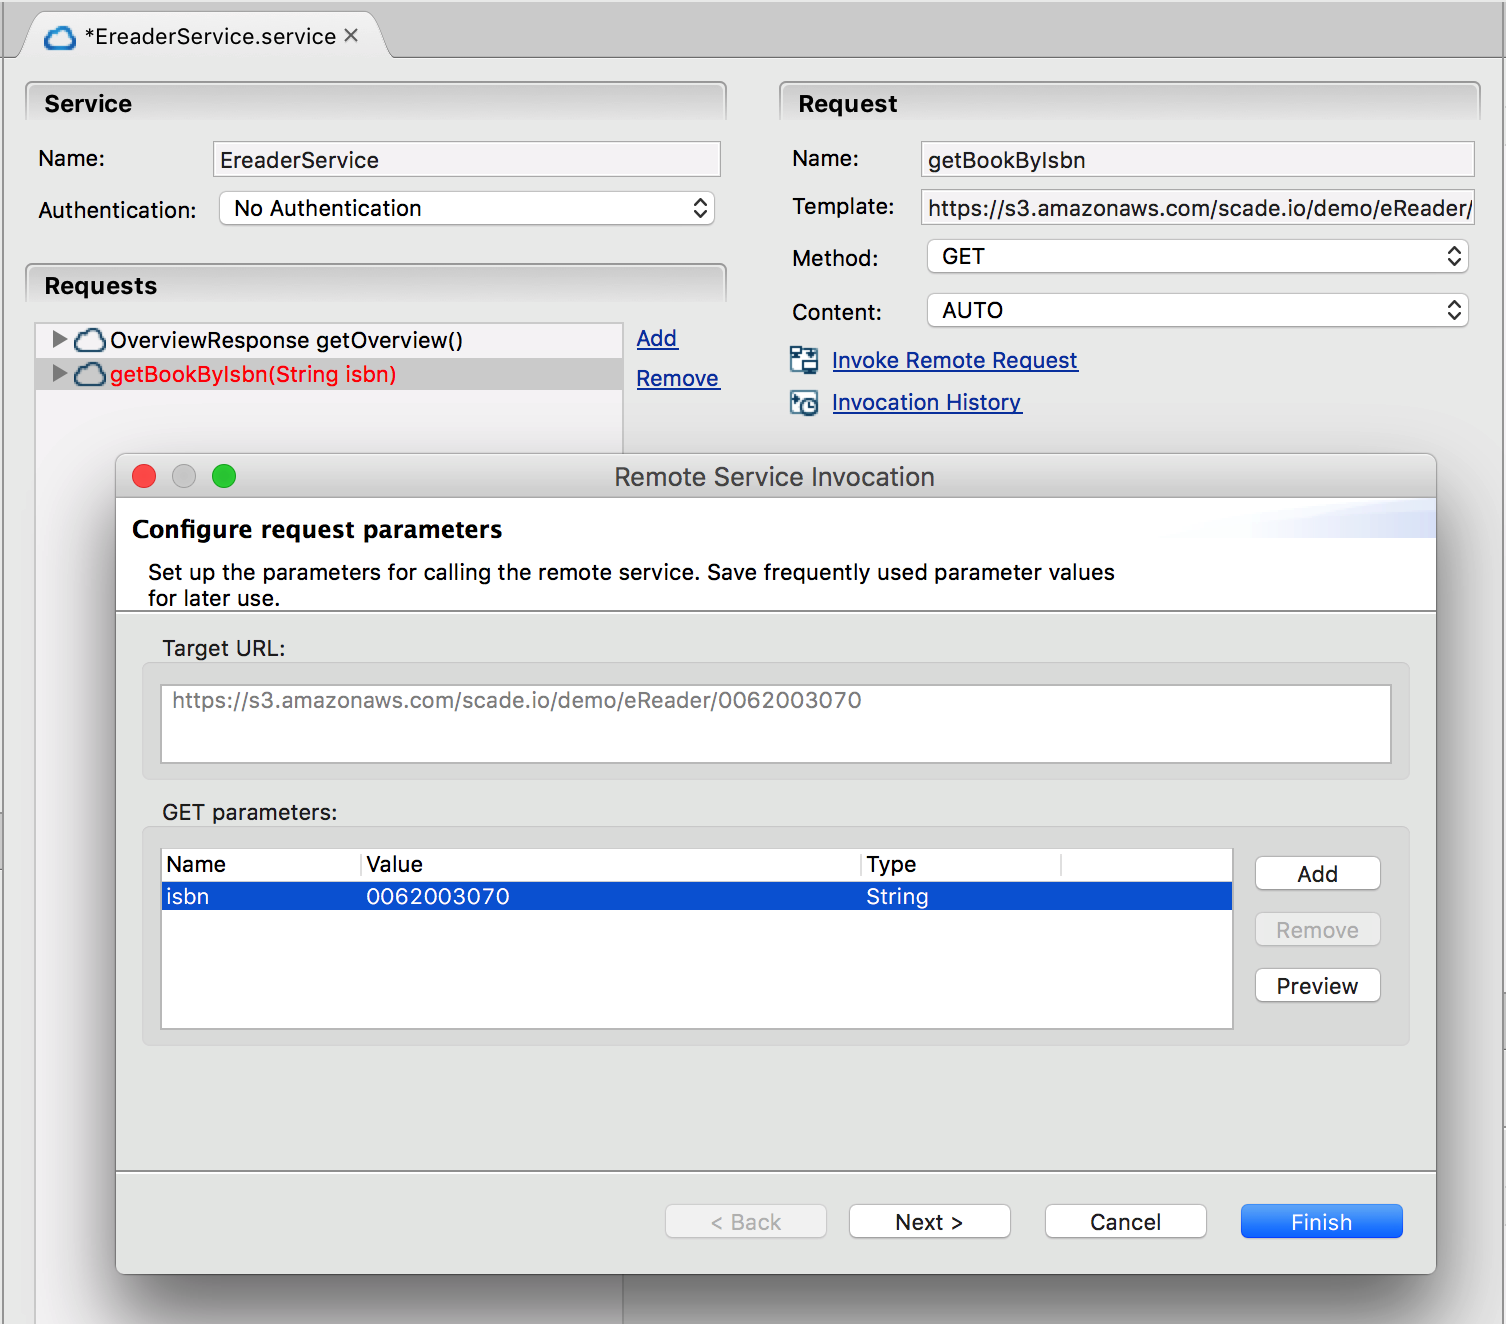
d. Press Invoke Remote Request
e. Set ISBN value to 0062003070
f. Press next, review JSON and press next again
g. Set name to BookDetailResonse
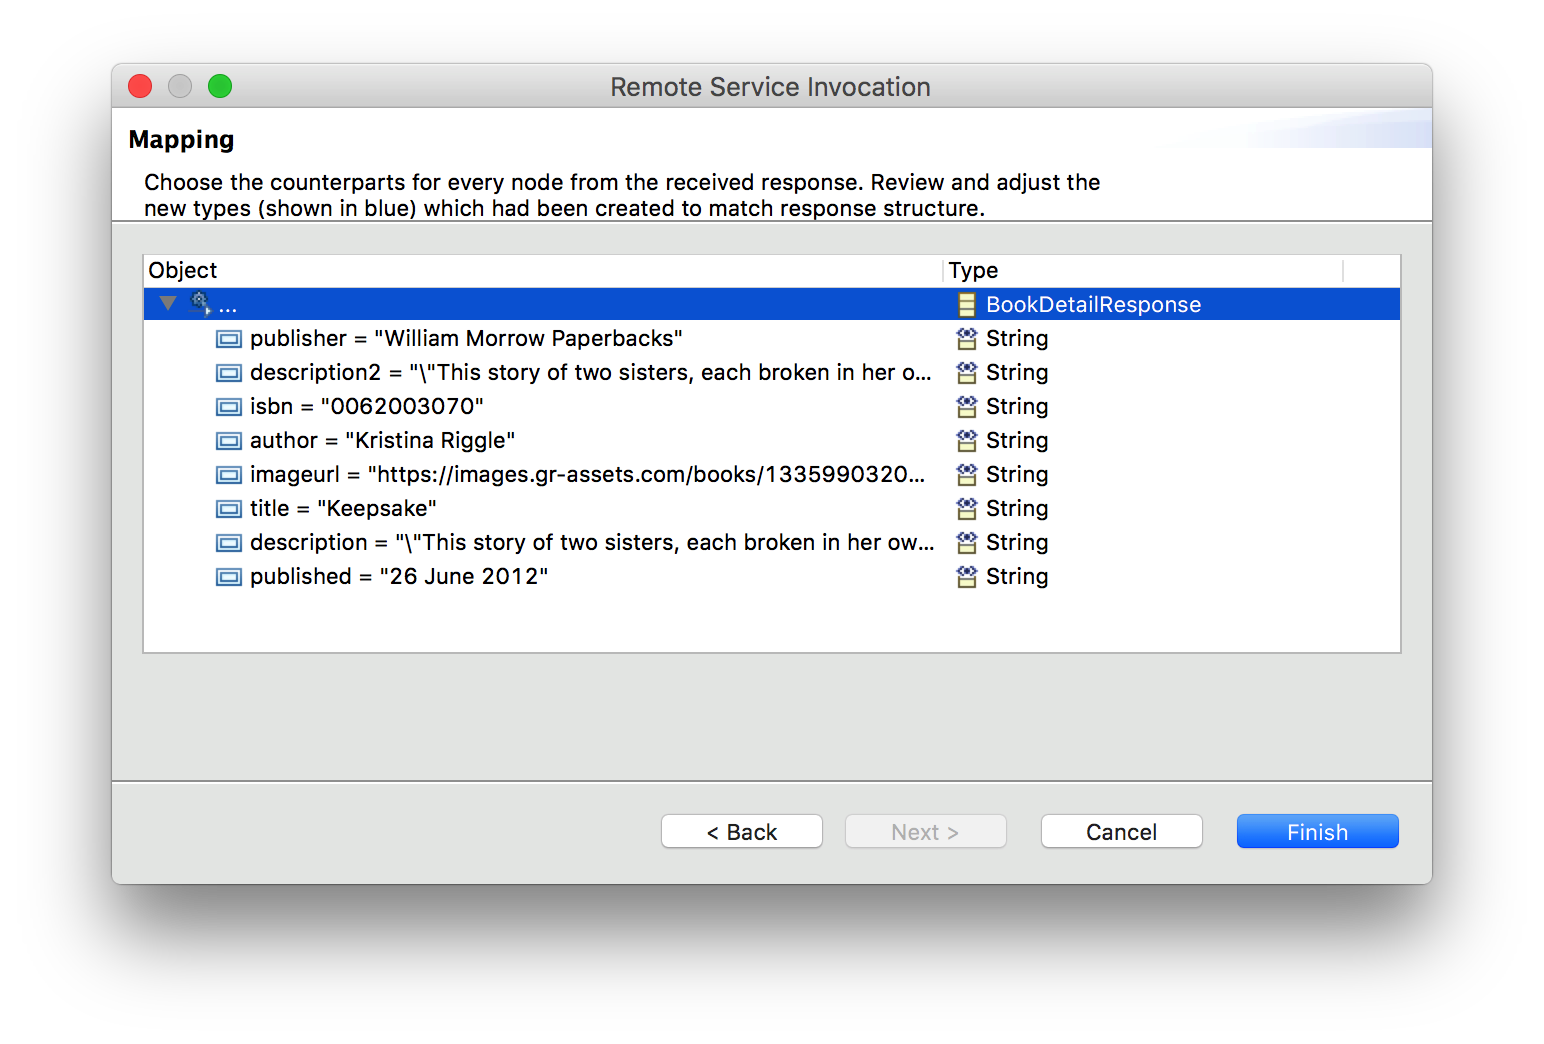
After pressing the finish button, all the necessary data structure is generated.
- Write some Swift code to map from BookDetailResponse to Book
func getBookFromBookDetailResponse( bookdetail : BookDetailResponse) -> Book? {
		let book = Book(id:bookdetail.isbn, title: bookdetail.title, author :bookdetail.author , bookCoverUrl: bookdetail.imageurl)
		book.description1 = bookdetail.description
		book.description2 = bookdetail.description2
		book.published = bookdetail.published
		book.publisher = bookdetail.publisher

		return book
}- Add a method retrieveBook to the BookManager to retrieve the book
func retrieveBook(isbn:String) -> Book? {
		let bookdetail = EreaderServiceManager.getInstance().getBookByIsbn(isbn:isbn)
		let book = getBookFromBookDetailResponse(bookdetail:bookdetail!)
		return book // book
	}
Add onEnter event handler
Whenever the user clicks on a book bitmap in the main page, the Bookdetails page is opened using the ISBN number of the book. The onEnter event parses the event object to extract the ISBN number.
import ScadeKit

class BookdetailsPageAdapter: SCDLatticePageAdapter {

	dynamic var book : Book?
	dynamic var trueAttribute : Bool = true


	// page adapter initialization
	override func load(_ path: String) {
		super.load(path)

		// Add onEnter event that loads book data
		self.page!.onEnter.append(
			SCDWidgetsEnterEventHandler{(ev:SCDWidgetsEnterEvent?)
				in self.enterpage(ev:ev!)})

		// add back button event to go back to Catalog page
		let back = self.page!.getWidgetByName("viewBackButton") as! SCDWidgetsContainer
		back.onClick.append(SCDWidgetsEventHandler{_ in self.goBack() })
	}

	func enterpage(ev:SCDWidgetsEnterEvent){
		if let isbn = ev.data as? String {
			print("loading book \(isbn)")
			self.book = BookManager.sharedInstance.getBook(isbn:isbn)!
		}
	}

	func goBack() {
		self.navigation!.go("main.page", transition : "BACKWARD_PUSH")
	}
}
The ISBN book number (bookId) is passed from the onClicked event when clicking the book's bitmap. Lets extend the function that we created in the step with the navigation!.go method:
func displayBookDetails(bookId:String) {
		print("BookId : \(bookId)")
		self.navigation!.go(with:"BookDetail.page", data : bookId, transition : "FORWARD_PUSH")
	}
Add scrolling to the Book Detail page
Create the settings page
The settings page presents a list of options for making settings. We like to demonstrate the use of the page editor to duplicate repeating UI elements using copy and paste

- Create navigation bar and tool bar (not shown here)
- Use the icon more-button-of-three-dots_red.svg for the more settings button
- Create the settings page as shown below
- We use Bodoni 72 Book as the font for the > sign
- We append click event handler to the rowview
- Add an event handler to the main.page to capture click event from toolbar
// setup toolbar events
let item = self.page!.getWidgetByName("itmMore") as! SCDWidgetsContainer
item.onClick.append(SCDWidgetsEventHandler{ _ in self.gotoMore()})- Don't forget to register page in start.swift file

Updated 2 months ago